

With Dropbox’s document scanner, a user can take a photo of a document with their phone and convert it into a clean, rectangular PDF. In our previous blog posts (Part 1, Part 2), we presented an overview of document scanner’s machine learning backend, along with its iOS implementation. This post will describe some of technical challenges associated with implementing the document scanner on Android.
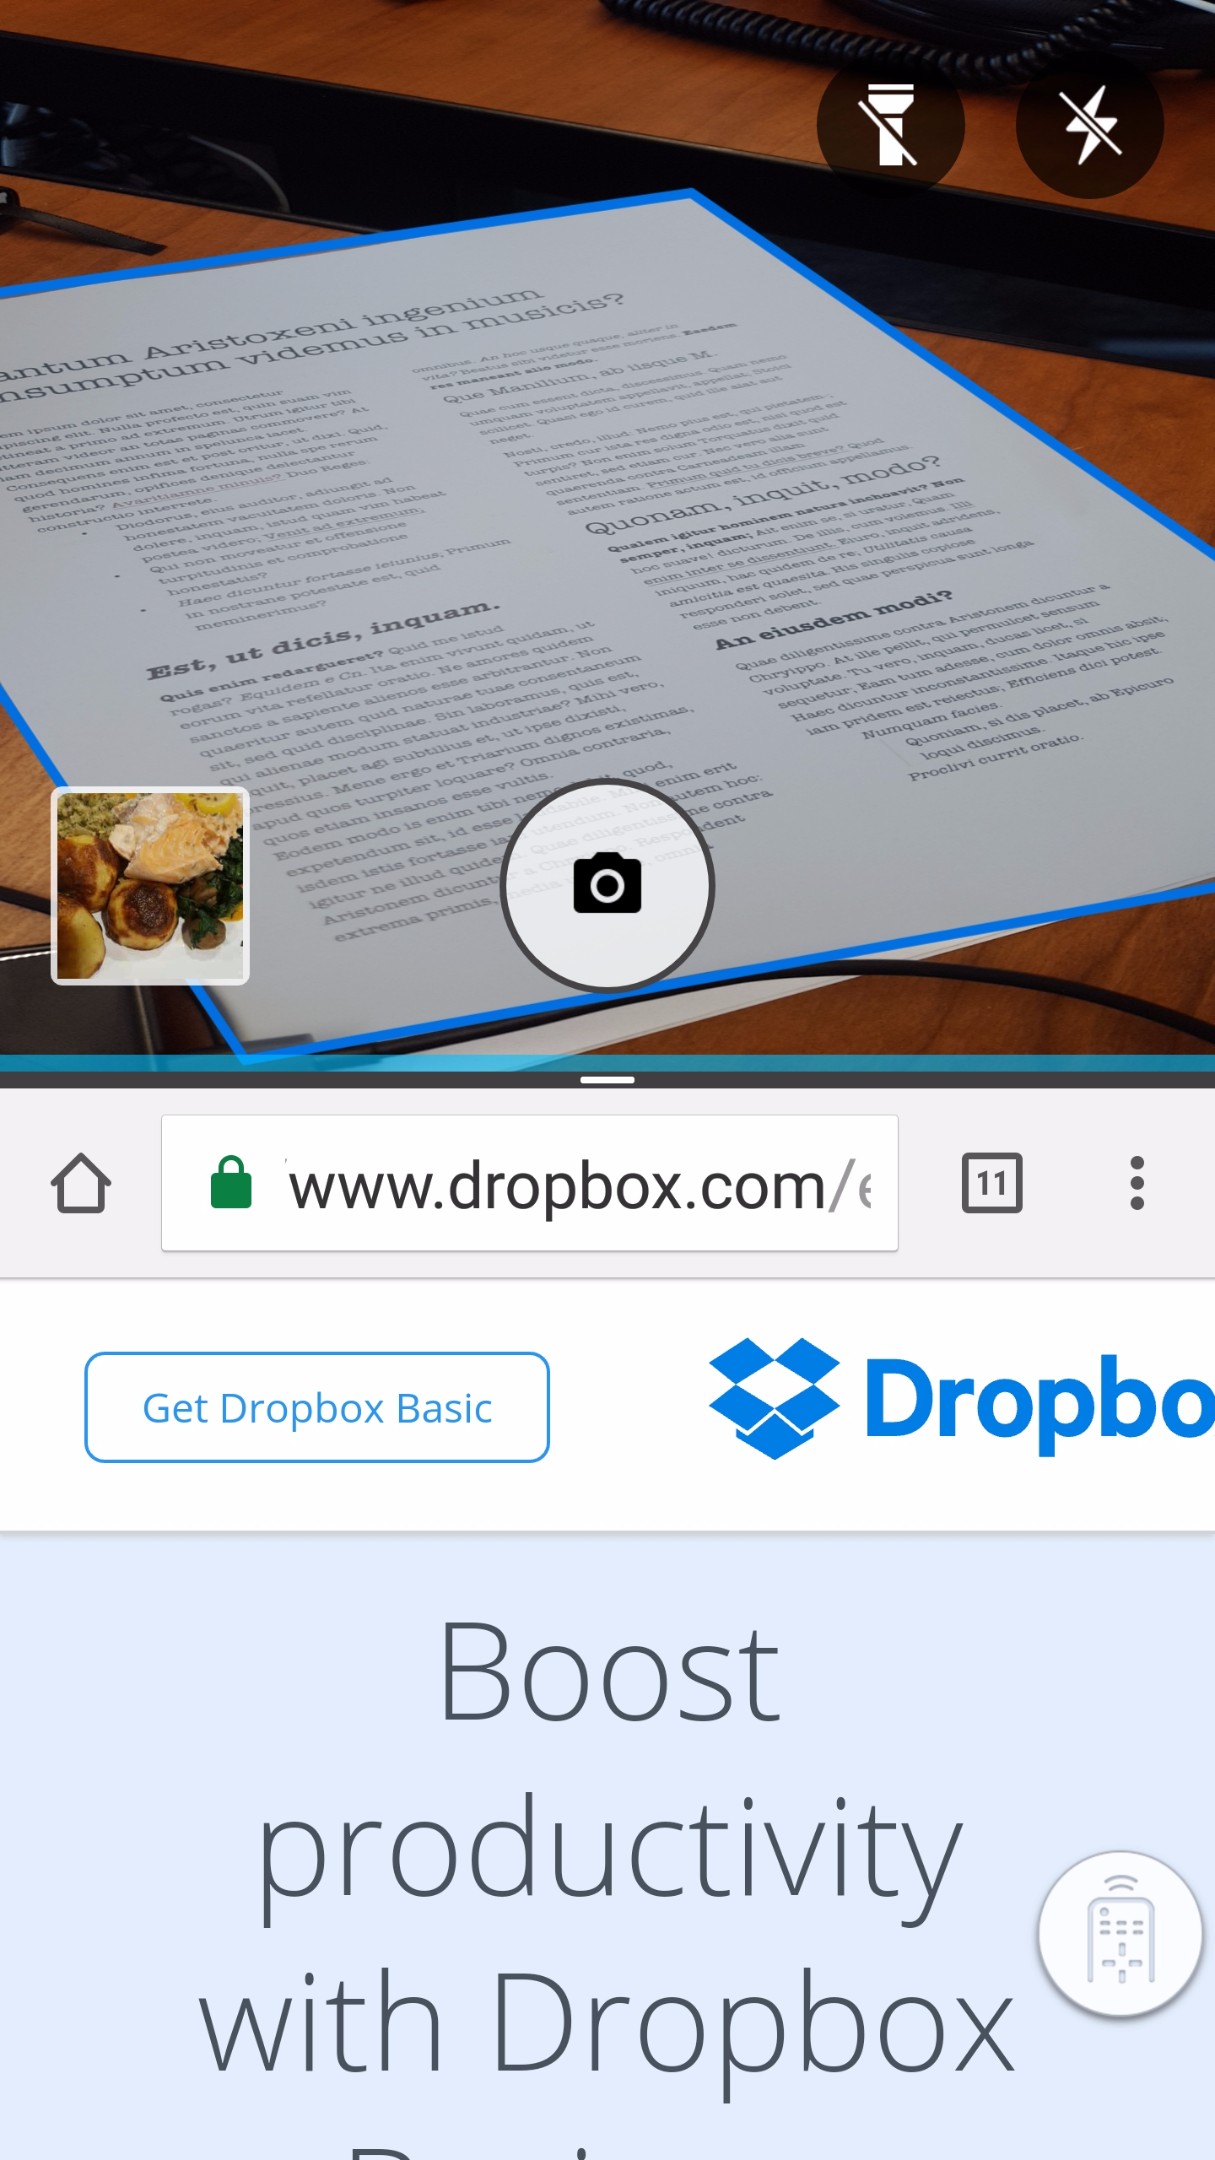
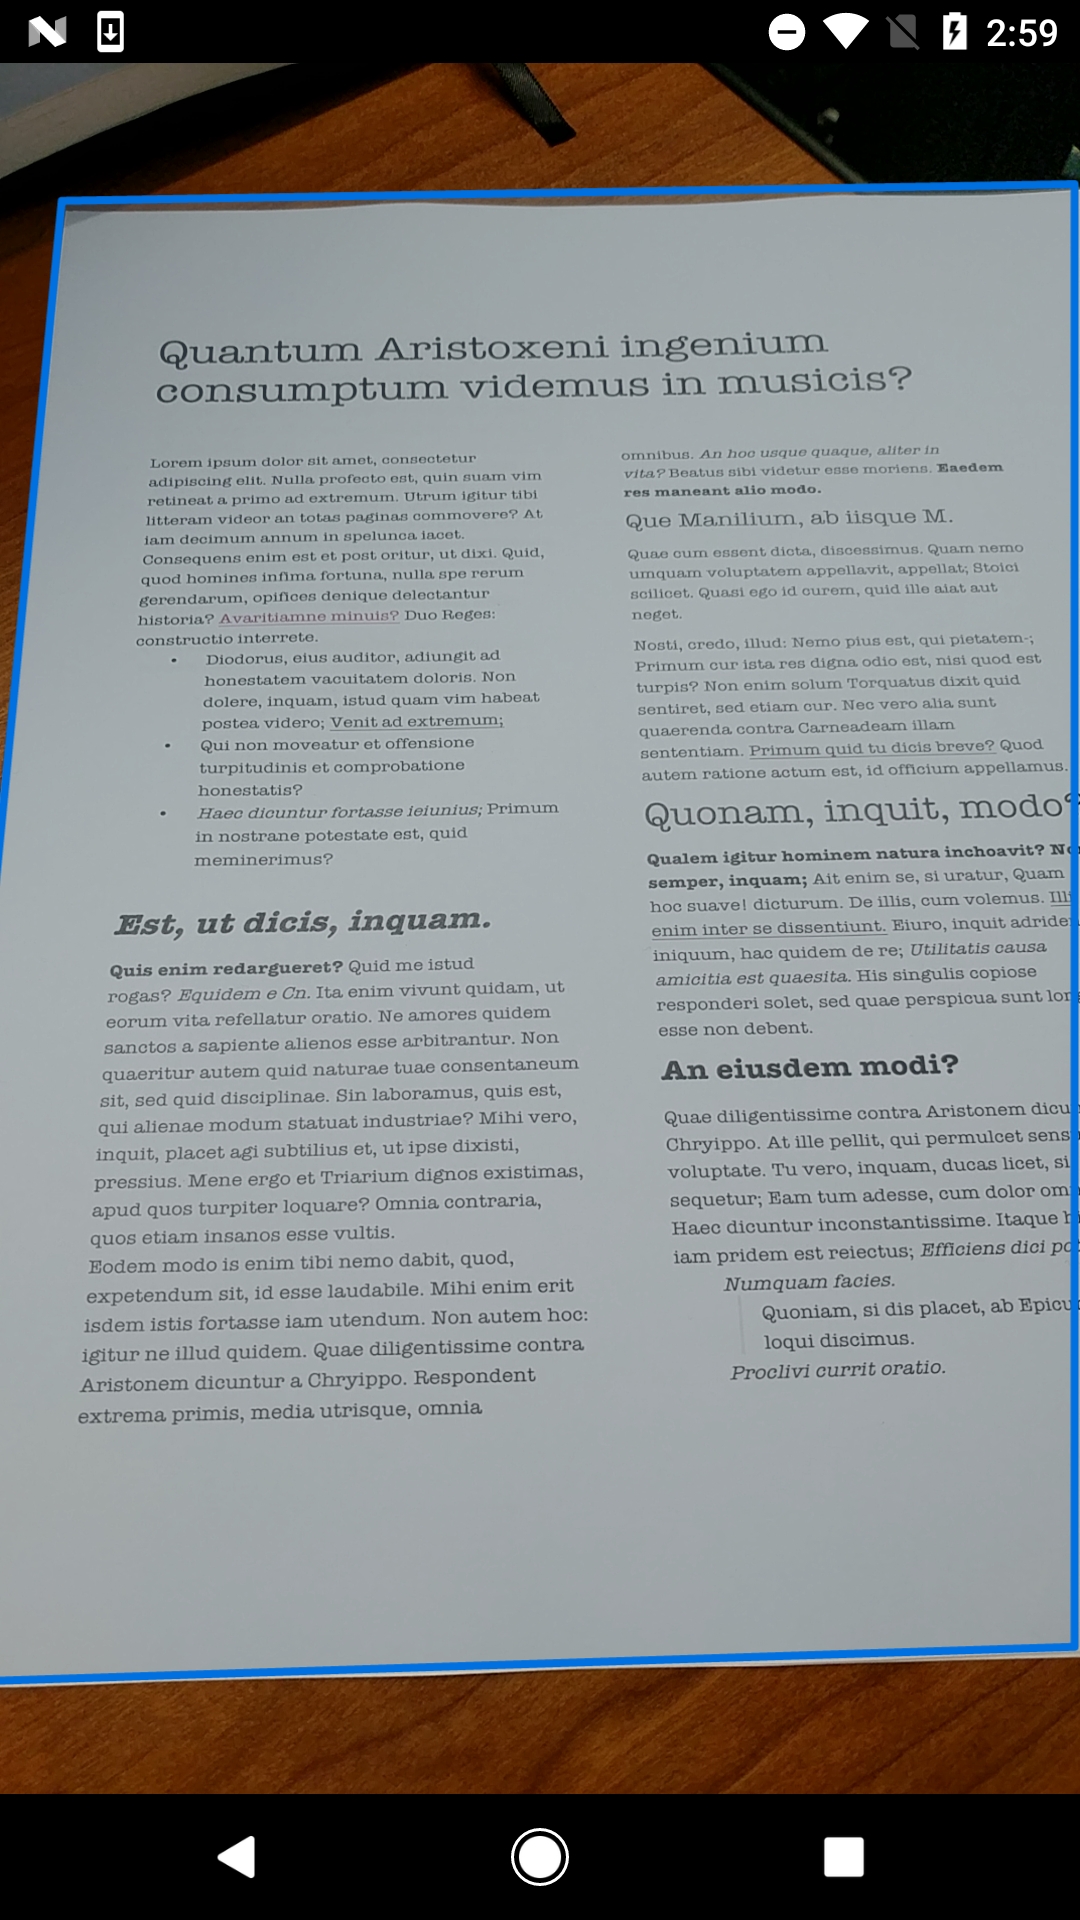
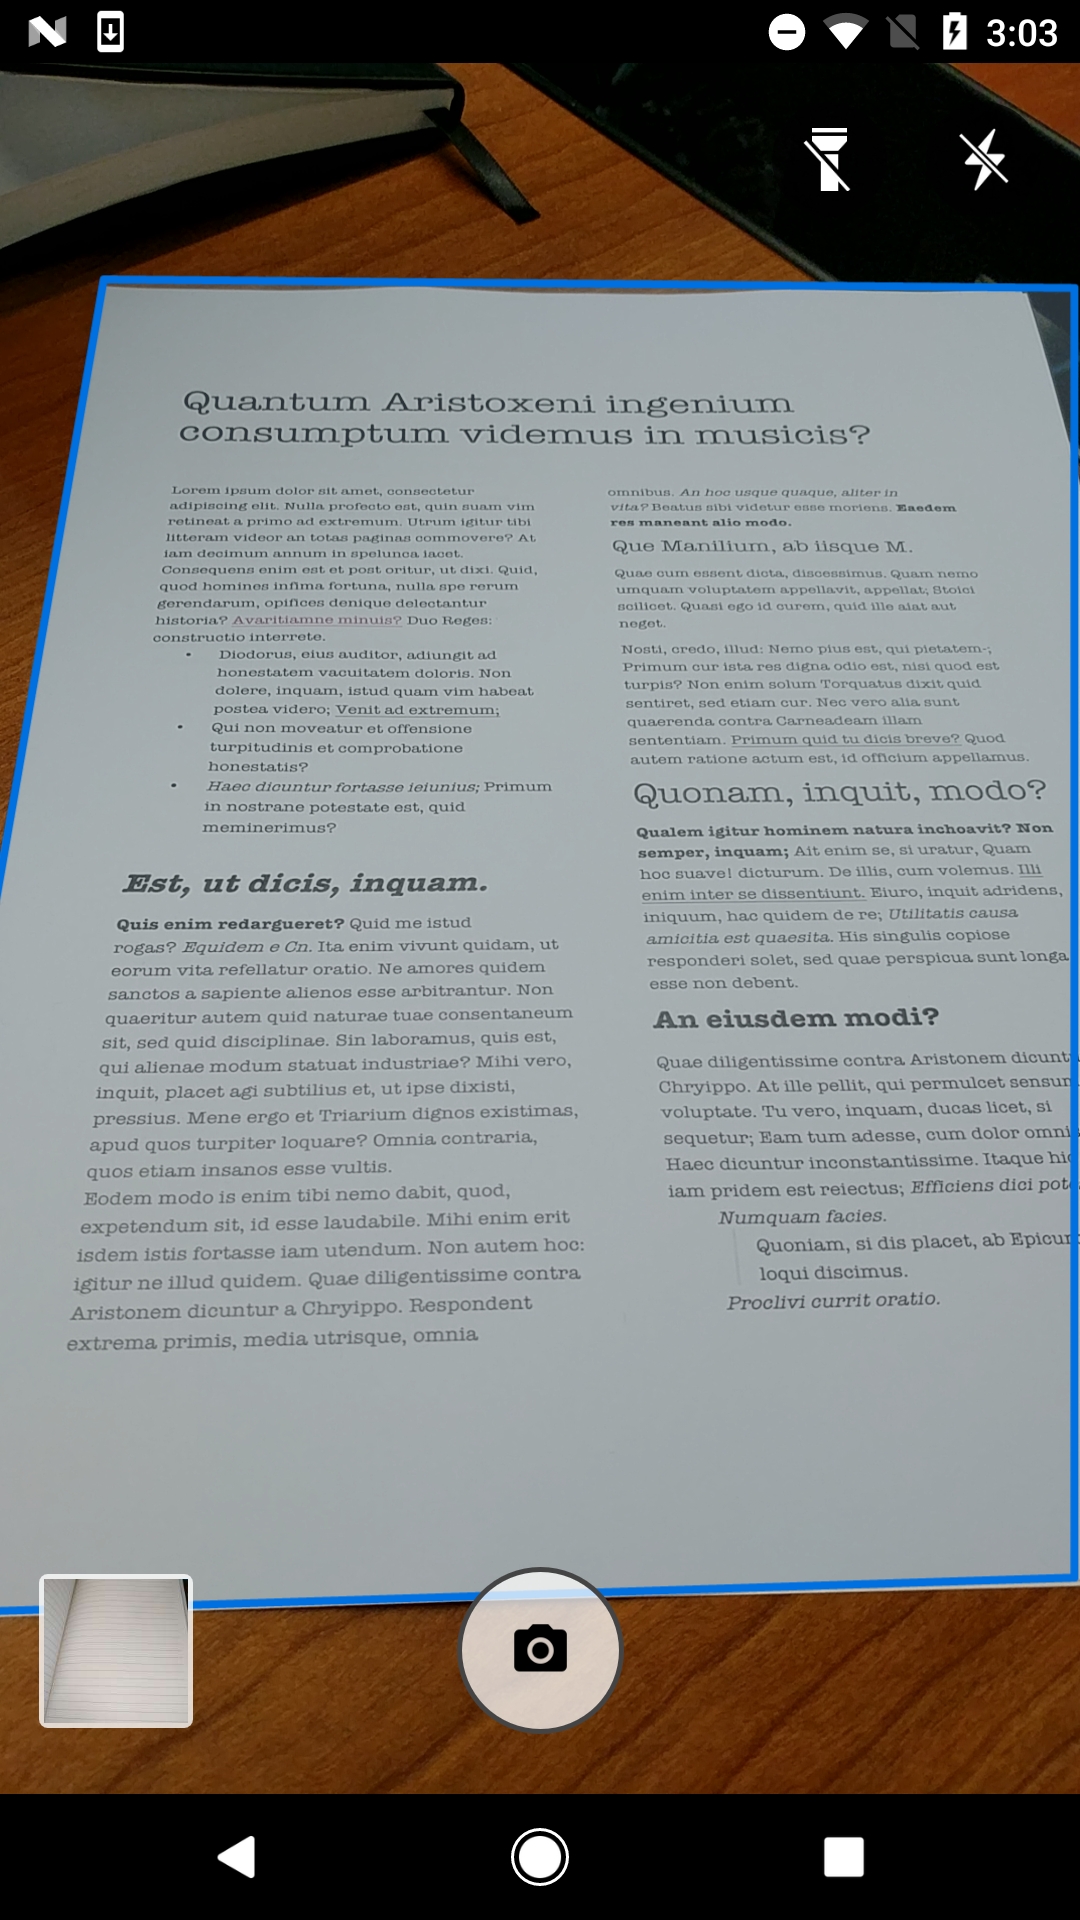
We will specifically focus on all steps required to generate an augmented camera preview in order to achieve the following effect:
This requires custom interaction with the Android camera and access to individual preview frames.
Normally, when a third-party app requests a photo to be taken, it can be achieved easily in the following way:
Intent takePictureIntent = new Intent(MediaStore.ACTION_IMAGE_CAPTURE);
startActivityForResult(takePictureIntent, REQUEST_TAKE_PHOTO);
This delegates the task of taking a photo to the device’s native camera application. We receive the final image, with no control over intermediate steps.
However, we want to augment the live preview, detecting the document and displaying its edges. To do this, we need to create a custom camera application, processing each individual frame to find the edges, and drawing a blue quadrilateral that symbolizes the document’s boundaries in the live preview.
The whole cycle consists of the following steps:
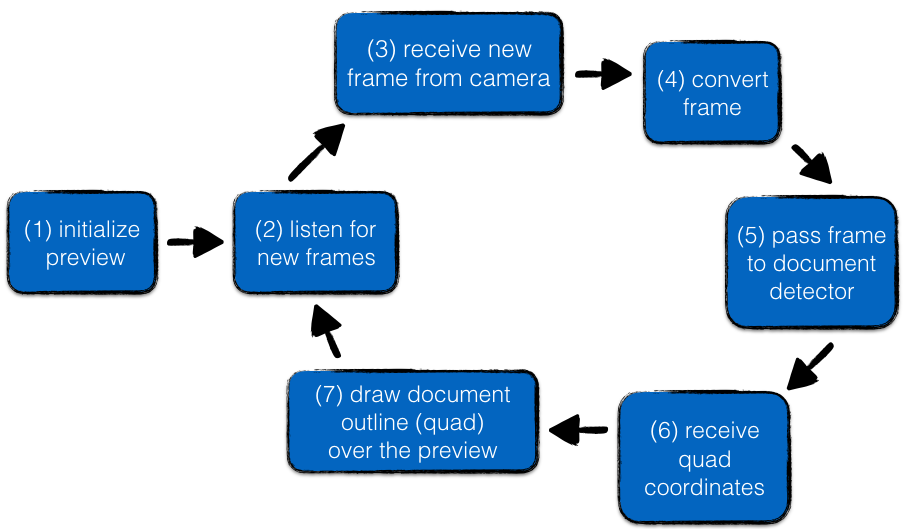
Needless to say, steps (2) – (7) must take as little time as possible so that the movement of the blue quadrilateral appears to be smooth and remains responsive to camera movements.
It is believed than 10-12 frames per second is the minimum frequency required for the human brain to perceive motion. This means the whole cycle presented on the diagram should take no more than 80 ms. The Android hardware landscape is also very fragmented, which poses additional challenges. Cameras range from 0.3 to 24 megapixels, and unlike iPhones we can’t take the presence of any hardware feature (such as autofocus, back-facing camera or physical flash LED) for granted. The code needs to defensively check if each requested feature is there.
In the rest of the post, we’ll discuss each of the steps presented in the diagram.
Initializing camera preview
The first step to the augmented reality preview is to create a custom camera preview without any augmented reality. For gaining access to the device’s camera, we will be using android.hardware.Camera object.
Note: The android.hardware.Camera has been deprecated in version 5.0 (API Level 21) and replaced with much more powerful android.hardware.camera2 API. However, at the time of writing this post, roughly 50% of the active Android devices ran versions older than 5.0, so we were unable to avail of the improved camera API.
The very first step before starting preview is to confirm whether a device has a rear-facing camera. Unlike iOS, we cannot assume it is true; the Nexus 7 tablet, for example, was equipped with a front-facing camera only.We can perform such a check using the following snippet:
PackageManager pm = context.getPackageManager();
pm.hasSystemFeature(PackageManager.FEATURE_CAMERA);
PackageManager.FEATURE_CAMERA refers to the camera facing away from the screen. To check for the presence of a front camera, there is a separate flag available - FEATURE_CAMERA_FRONT. Hence, we are fine with the check above. Tip: Accessing device camera requires proper permissions. This includes both defining required permissions in AndroidManifest.xml:Another issue is that the camera sensor orientation that can vary depending on a specific device. The most common one is landscape, but so-called “reverse landscape orientation” used for the Nexus 5X camera sensor has caused a lot of problems to many apps that were unprepared. It is very important to set the display orientation correctly so that it works properly regardless of the device’s specific setup. The snippet below shows how to do it.<uses-feature android:name="android.hardware.camera" android:required="false" /><uses-feature android:name="android.hardware.camera.autofocus" android:required="false" /><uses-feature android:name="android.hardware.camera.flash" android:required="false" />and requestingpermission.CAMERApermission at runtime so that it works on Android M and later versions.
private void setCorrectOrientation() {
    CameraInfo info = new CameraInfo();
    Camera.getCameraInfo(getBackCameraId(), info);
    int orientation = getWindowManager().getDefaultDisplay().getRotation();
    int degrees = 0;
    switch (orientation) {
        case Surface.ROTATION_0:
            degrees = 0;
            break;
        case Surface.ROTATION_90:
            degrees = 90;
            break;
        case Surface.ROTATION_180:
            degrees = 180;
            break;
        case Surface.ROTATION_270:
            degrees = 270;
            break;
        default:
            throw new RuntimeException("Unsupported display orientation");
    }

    mCamera.setDisplayOrientation((info.orientation - degrees + 360) % 360);
}
Another very important thing to remember is the fact, that unlike iOS, there are multiple potential aspect ratios to support. On some devices, the camera capture screen has buttons that float over the preview, while on others there is a dedicated panel holding all the controls.
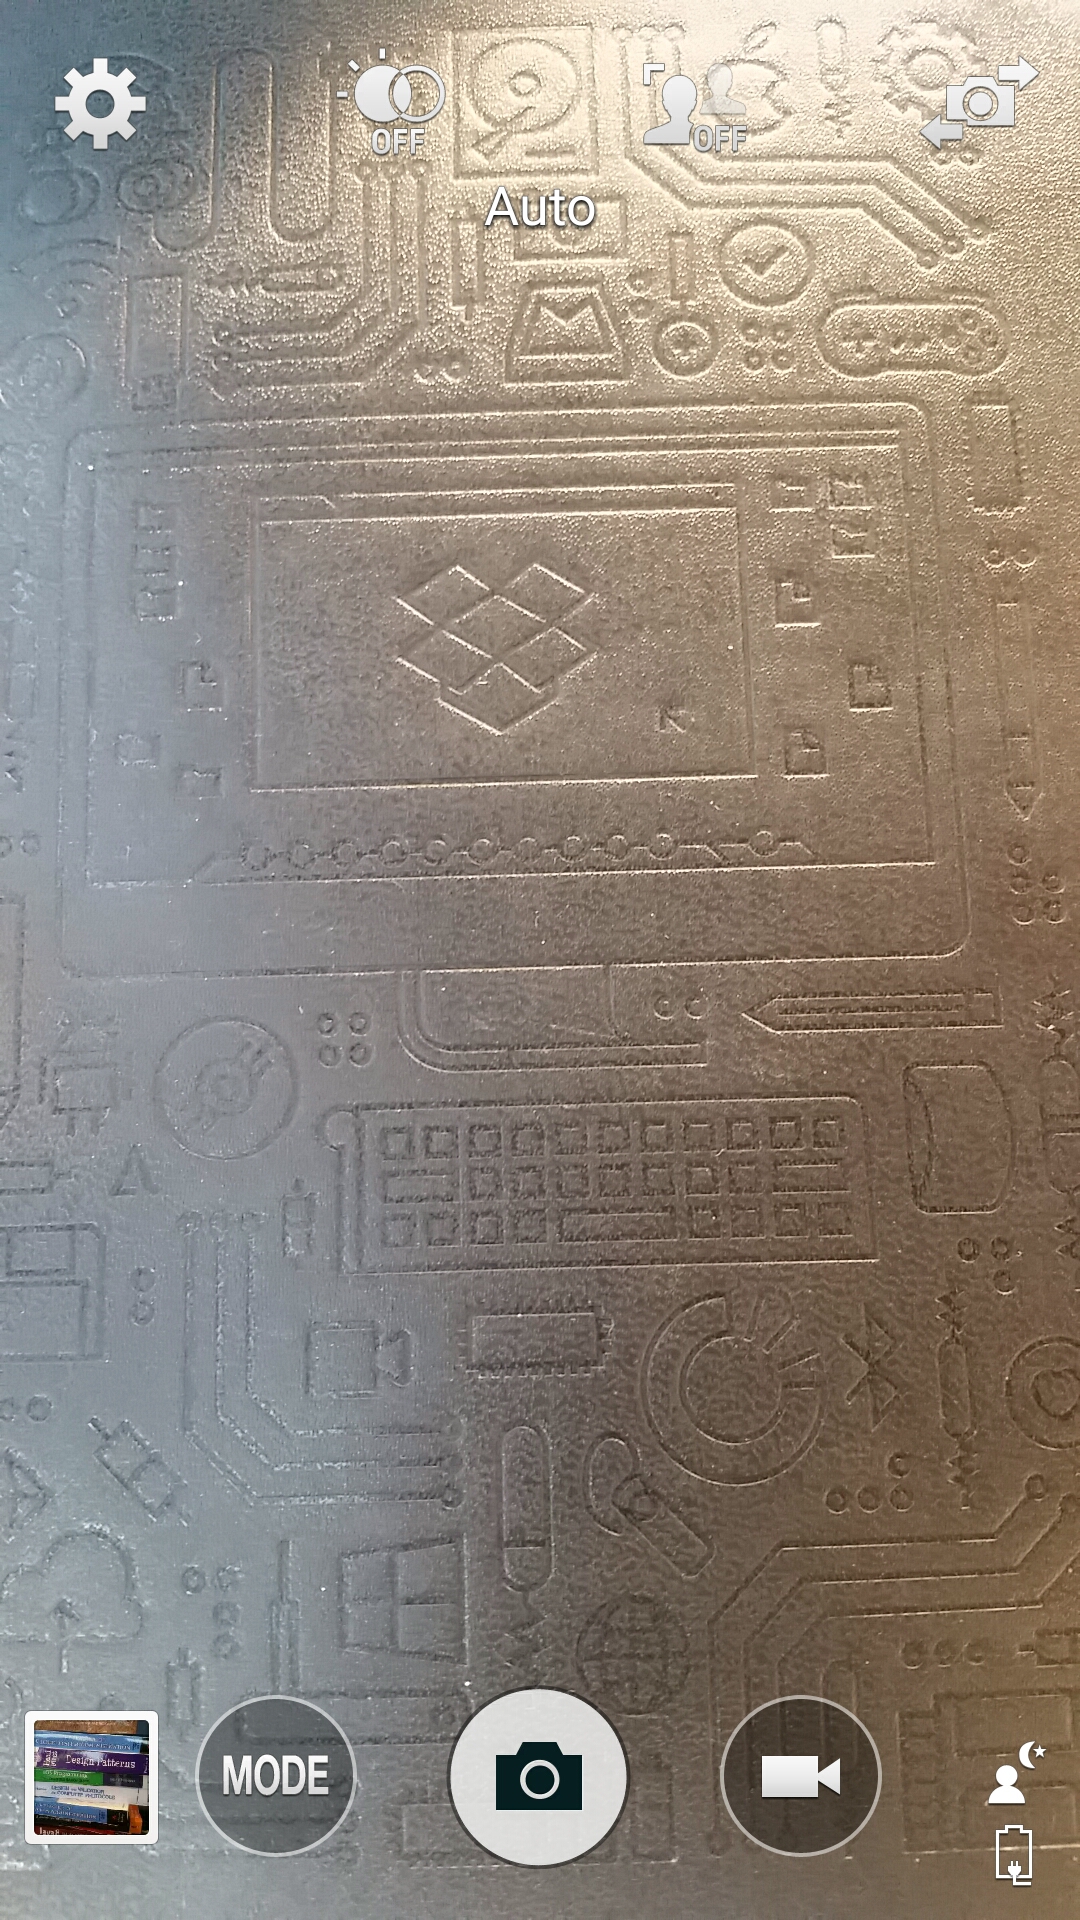
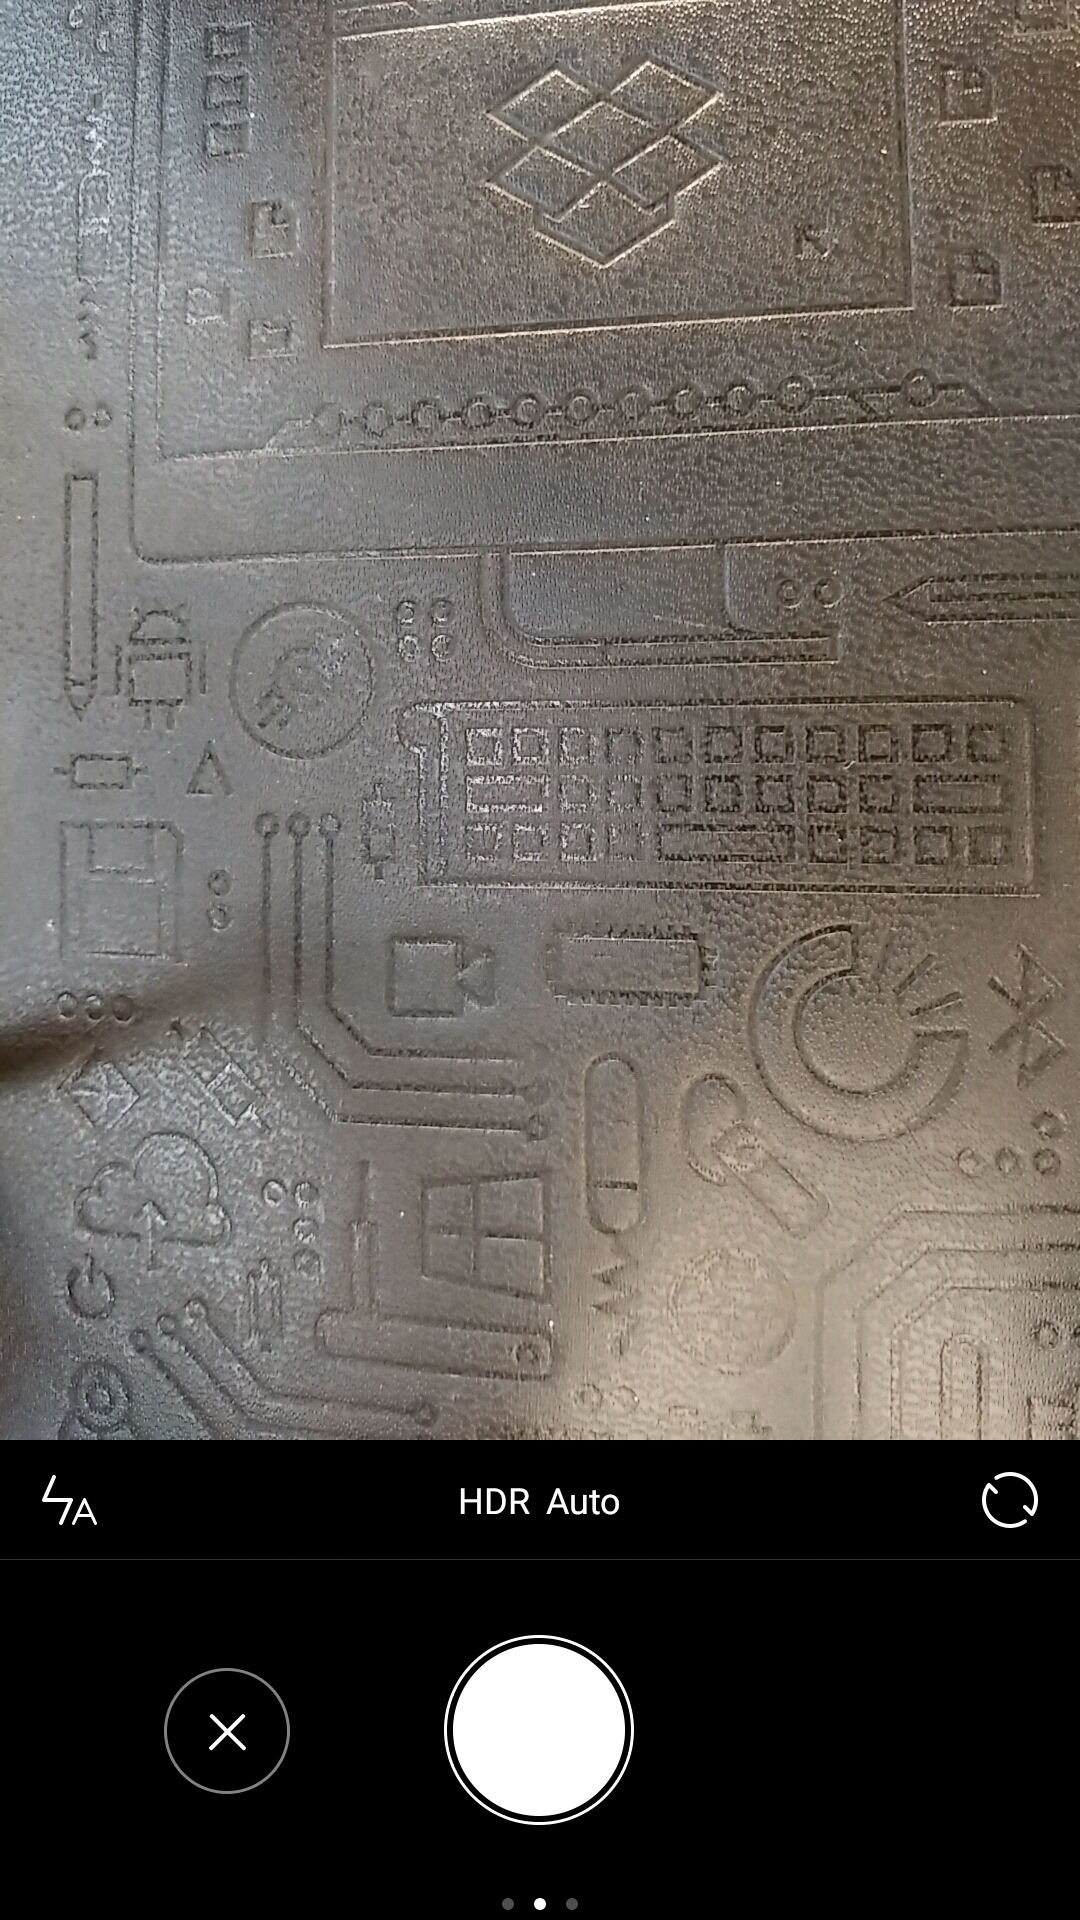
Camera capture screen on the Xiaomi Mi4 This is why we need to calculate the optimal preview size with the closest aspect ratio to our preview rectangle.
The camera parameters object has a method called mCamera.getParameters().getSupportedPreviewSizes() that returns a list of preview dimensions supported by a given device. In order to find the best match, we iterate through the returned list and find the closest dimensions to the current preview size that match our aspect ratio (with some tolerance).
This way, the document scanner will behave correctly even when unusual aspect ratio is needed due to e.g. operating in multi-window mode.
Binding the camera preview to a UI component
There are several ways in which camera sensor data can be tied to an UI component. The oldest and arguably simplest way is using SurfaceView as shown in an official Google API demo example.
However, SurfaceView comes with several limitations, as it’s just a drawing surface embedded inside the view hierarchy that is behind the window which contains all views.Two or more SurfaceViews cannot be overlaid, which is problematic for augmented reality use cases such as the document scanner, as issues with z-ordering may arise (and these issues will be likely device-specific).
Another choice is a TextureView which is a first-class citizen in the view hierarchy. This means it can be transformed, scaled and animated like any other view.
Once the camera object is acquired and parameters are set, we can start the preview by calling mCamera.startPreview() .
Tip: It is very important to hold the camera object only when your app is in the foreground and release it immediately onPause. Otherwise, the camera may become unavailable to other apps (or our own app, if restarted).
Displaying controls over the live preview
In order to place UI components on top of the live preview, it’s best to use FrameLayout. This way, vertical ordering will match the order in which components were defined in the layout file.
<FrameLayout xmlns:android="http://schemas.android.com/apk/res/android"
             android:layout_width="match_parent"
             android:layout_height="match_parent">
    <TextureView <!-- (1) -->
        android:id="@+id/camera_preview"
        ... />

    <QuadrilateralView <!-- (2) -->
        android:id="@+id/quad_view"
        ... />
    <android.support.constraint.ConstraintLayout <!-- (3) -->
        android:id="@+id/camera_controls">
        ...
    </android.support.constraint.ConstraintLayout>
</FrameLayout>
This assumes that a TextureView is being used for the live preview. For SurfaceView , z-order can be adjusted with the setZOrderMediaOverlay method.
Offering flash and torch options
In order to improve the user experience in low light conditions we offer both torch and flash toggles. These can be enabled via camera parameters Parameters.FLASH_MODE_TORCH and Parameters.FLASH_MODE_ON correspondingly. However, many Android devices (most commonly tablets) don’t have a physical LED flash, so we need to check for its presence before displaying the flash and torch icons. Once the user taps on the torch or flash icon, we change the flash mode by calling mCamera.getParameters().setFlashMode().
It is important to remember that before changing camera parameters, we need to stop the preview, using mCamera.stopPreview(), and start it again when we are done, using mCamera.startPreview(). Not doing this can result in undefined behavior on some devices.
Managing focus
On devices that support it, we use FOCUS_MODE_CONTINUOUS_PICTURE to make the camera refocus on the subject very aggressively in order to keep the subject sharp at all times. On devices that don’t support it, it can be emulated by requesting autofocus manually on each camera movement, which in turn can be detected using the accelerometer. The supported focus modes can be obtained by calling mCamera.getParameters().getSupportedFocusModes()
(2) Listening for new frames
In order to receive a callback each time a new frame is available, we need to register a listener. For TextureView , we can do this by calling mTextureView.setSurfaceTextureListener
Depending on whether a SurfaceView or TextureView has been used, the corresponding callback is either Camera.PreviewCallback with onPreviewFrame(byte[] data, Camera camera) invoked each time new frame is available or TextureView.SurfaceTextureListener with onSurfaceTextureUpdated(SurfaceTexture surface) method.
Once a SurfaceView or TextureView is tied to the camera object, we can start preview by calling mCamera.startPreview() .
(3) Receiving new frame from the camera
Every time a new frame is available (for most devices, it occurs 20-30 times per second), the callback is invoked.
When onPreviewFrame(byte[] data, Camera camera) is being used to listen for new frames, it’s important to remember that the new frame will not arrive until we call camera.addCallbackBuffer(mPreviewBuffer) in order to signal that we are done with processing the buffer and the camera is free to write to it again.
If we use SurfaceTexture callbacks to receive new frames, onSurfaceTextureUpdated will be invoked every time new frame is available and it is up us whether it should be processed or discarded.
(4) Converting the frame
Our document detector described in the previous blog posts requires the frame, which is later passed to C++ code, to be of specific dimensions and in a specific color space. Specifically, this should be a 200 x 200px frame in RGBA color space. For onPreviewFrame(byte[] data, Camera camera) , the data byte array is usually in NV21 format, which is a standard for Android camera preview.
This NV21 frame can be converted to an RGBA bitmap using the following code:
Camera.Parameters = camera.getParameters();
YuvImage yuv = new YuvImage(data, parameters.getPreviewFormat(), width, height, null);
ByteArrayOutputStream out = new ByteArrayOutputStream();
yuv.compressToJpeg(new Rect(0, 0, width, height), 100, out);

byte[] bytes = out.toByteArray();
Bitmap bitmap = BitmapFactory.decodeByteArray(bytes, 0, bytes.length);
The bad news is, using this method, it takes 300-500 ms to process a 1920 x 1080 frame, which makes it absolutely unacceptable for real-time applications.
Fortunately, there are several ways to do this conversion much faster such as using OpenGL/OpenCV or native code. However, there are two RenderScript intrinsic scripts that can provide the requested functionality without having to drop down to lower-level APIs — ScriptIntrinsicResize combined with ScriptIntrinsicYuvtoRGB. By applying these two, we were able to get the processing time down to 10-25 ms thanks to the hardware acceleration.
Things look much simpler when the preview is implemented using TextureView and onSurfaceTextureUpdated(SurfaceTexture surface) callback. This way, we can get the bitmap straight from the TextureView once a new frame is available:
int expectedImageWidth = pageDetector.getExpectedImageWidth();
int expectedImageHeight = pageDetector.getExpectedImageHeight();
Bitmap bitmap = mTextureView.getBitmap(expectedImageWidth, expectedImageHeight);
TextureView#getBitmap is generally known to be slow; however, when the dimensions of the requested bitmap are small enough, the processing time is very reasonable (5-15ms for our 200x200 case). While this isn’t a universal solution, it turned out to be both the fastest and the simplest for our application.
Moreover, as we mentioned earlier, the camera sensor orientation is usually either landscape (90 deg) or reverse landscape (270 deg), so the bitmap will most likely be rotated. However, instead of rotating the whole bitmap, it is much faster to rotate the quadrilateral returned by the document detector instead.
(5) Passing frame to document detector
On top of the scaled bitmap, our document detector requires passing a so called rotation matrix. Such matrix essentially provides information about phone movement direction (like tilting), which expedites calculating the next position of the quadrilateral. Knowing the coordinates of the quadrilateral at a given time, and the direction in which the device was moved, the document detector can estimate the anticipated future position of the quadrilateral, which speeds up computations.
In order to calculate the rotation matrix, we need to listen for two types of sensor events — Sensor.TYPE_MAGNETIC_FIELD and Sensor.TYPE_ACCELEROMETER that represent magnetic and gravity data. Having these, the rotation matrix can be obtained by calling SensorManager.getRotationMatrix . The document detector is written in C++, hence we need to make the call using JNI.
In case we cannot obtain sensor data, we pass an identity matrix.
Tip: Since calls to the detector can take anywhere from 20-100ms depending on Android device, they cannot be executed in the UI thread. We run them sequentially in a separate thread with elevated priority.
(6) Receiving quad coordinates
Once the call to document detector returns, we receive coordinates of the four points representing the quadrilateral that delimits the document edges. Understandably, these coordinates apply to the frame that was passed to the detector (e.g. 200x200 square that we mentioned), so we need to scale the coordinates to the original size of the preview. We also need to rotate the quadrilateral in case the camera orientation doesn’t match the orientation of the preview (see step (4) Converting frames, above).
(7) Drawing document outline (quad) over the preview
Having received frame coordinates, it is time to draw the quadrilateral over the camera preview (yet below camera controls). For simplicity and better control over z-ordering, we decided to create a custom View with an overriden onDraw() method that is responsible for drawing the quad on the canvas. Starting from Android 4.0 (Ice Cream Sandwich), drawing on a canvas is hardware-accelerated by default, which greatly improves performance.
Each time we receive an updated frame, we need to call invalidate() on the View . The downside of such an approach is that we have no control over the real refresh rate. To be precise, we don’t know how much time will elapse between us calling invalidate() and the OS invoking onDraw() on our view. However, we have measured that this approach allows us to achieve at least 15 FPS on most devices.
Tip: When implementing a custom view, it is very important to keep the onDraw() method as lightweight as possible and avoid any expensive operations, such as new object creation.
If drawing using a custom view is too slow, there are many faster, yet more complex solutions such as having another TextureView or leveraging OpenGL.
Sample performance measurements
We measured the time consumed by each step (in milliseconds) on several Android devices. In each case, the Dropbox app was the only non-preinstalled app. However, since there are many different factors that influence the performance (e.g. phone movements), these results cannot be treated as a benchmark and are here solely for illustrative purposes.
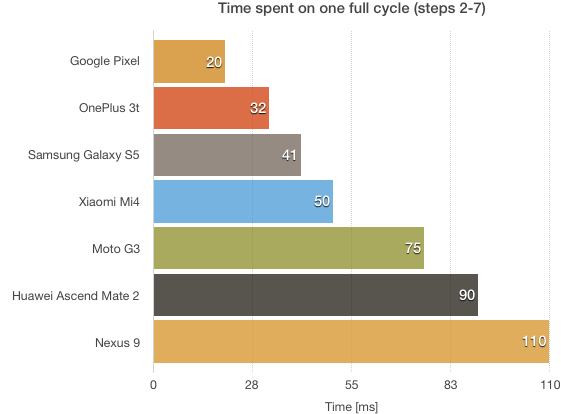
Note that faster devices usually have better cameras, so there is also more data to process. The worst case scenario for the document scanner would be a slow device with a very high resolution camera.
Turning existing photos into scans
The thumbnail we display in the lower left corner allows a user to preview the last gallery item. Tapping on it takes the user to the phone’s camera roll, where an existing photo can be selected for scanning.
The last available thumbnail (if any) can be retrieved using the following query:
String[] projection =
        new String[] {
            ImageColumns._ID, ImageColumns.DATA, ImageColumns.DATE_TAKEN,
        };
Cursor cursor =
        getContentResolver()
                .query(
                        MediaStore.Images.Media.EXTERNAL_CONTENT_URI,
                        projection,
                        null,
                        null,
                        ImageColumns.DATE_TAKEN + " DESC");
Tip: To ensure proper orientation of the thumbnail (and a full-size photo), we need to read and interpret itsExifTagscorrectly. This can be achieved usingandroid.media.ExifInterfaceclass. There are 8 different tags representing orientation that need to be interpreted.
If the cursor is empty (there are no photos in the gallery yet) or retrieving the bitmap threw an error (such as getting a null bitmap or exception), we simply hide the preview and make scanning from the gallery unavailable.
Try it out
Try out the Android Dropbox doc scanner today, and stay tuned for a future doc scanner post where we will describe the challenges in creating a multi-page PDF from a set of captured pages.


