

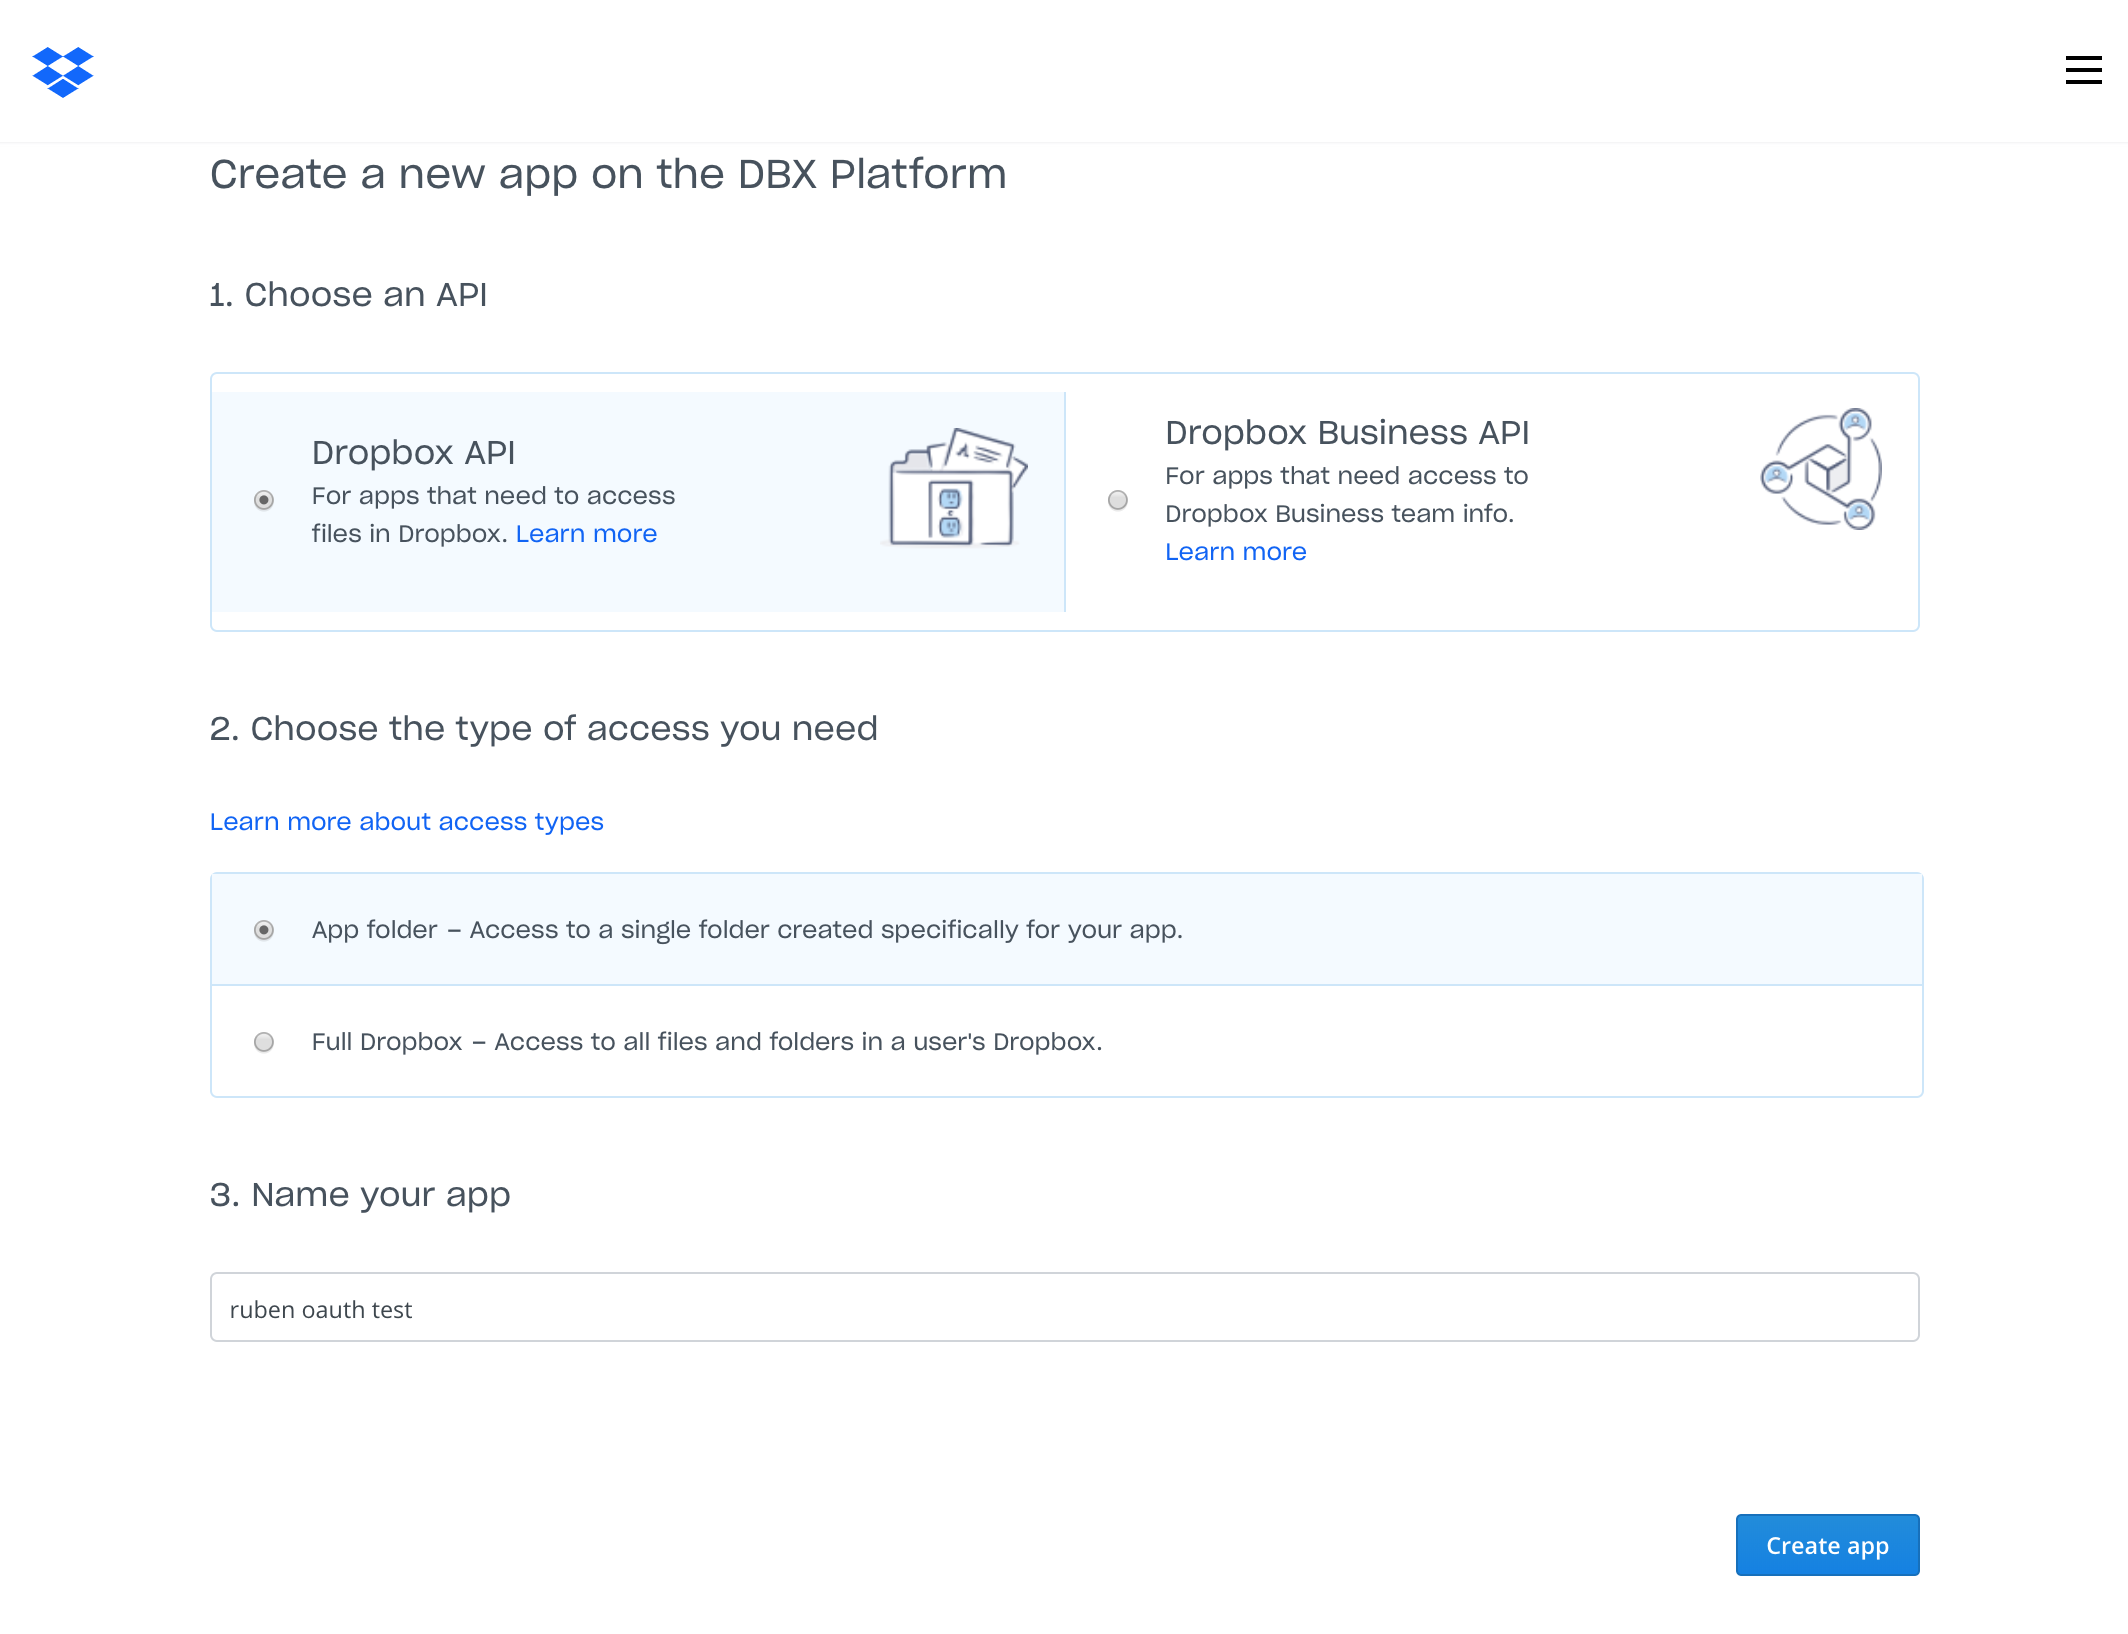
Configuring a Dropbox app
"Create App".
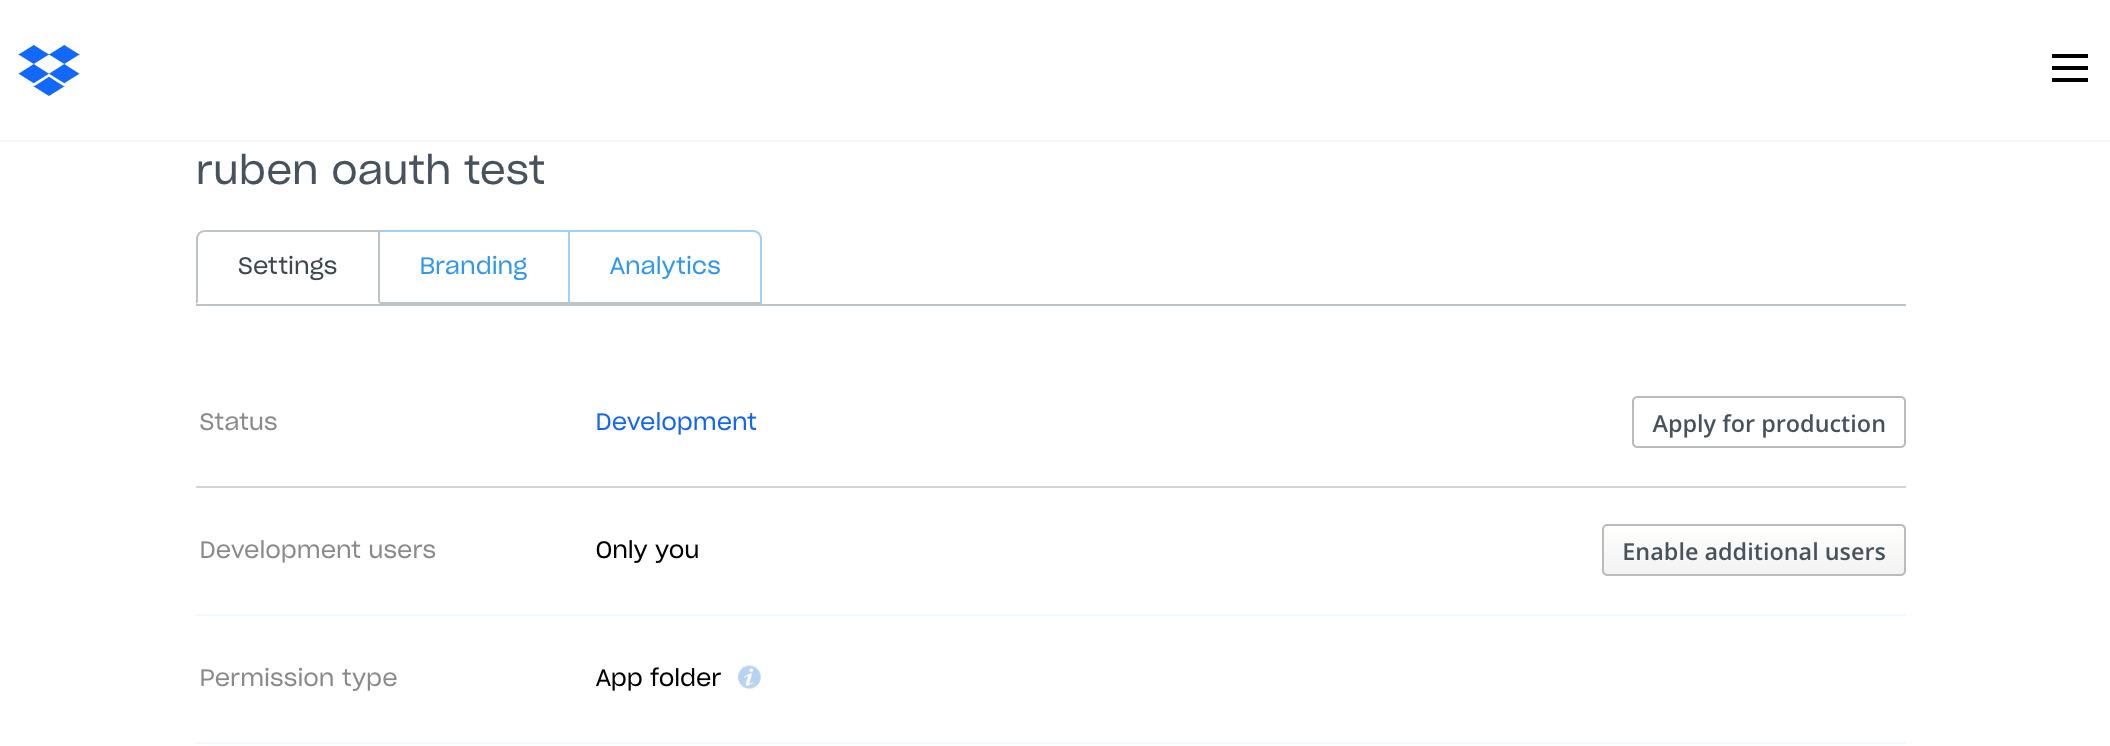
Now enable additional users in this app. In the settings page of your app you will find a button to do this. This step is important if you want users different to the owner of the app to be authorized.
Pre-register a redirect URI in the Dropbox admin console. For dev purposes, you can use localhost which is the only permitted http URI. So enter http://localhost:3000/auth and press the "Add" button.

Setting up your project
To install Node.JS, go to Nodejs.org and get the latest version. For this project, we need support for EcmaScript7 (ES7) so any version above 8.2.1 will work.
After Node.JS is installed in your local dev environment, create a project structure using Express generator. We will use Handlebars as the template engine which leverages actual HTML.
For more information about Express, visit their website. We also offer a short explanation about an Express project structure in this tutorial.
First install express generator running:
npm install express-generator -gNow create a project called "dbxoauth" using the handlebars template engine. Run the following command:
express --hbs dbxoauthThen, navigate to the folder created and install dependencies:
cd dbxoauth
npm install
We will be using the following node libraries:
- dotenv: to avoid hardcoding sensitive data such as keys and secrets
- express-session: to enable Web sessions used to store OAuth tokens and avoid the need to authenticate each time, as well as adding support to multiple users
- dropbox: Dropbox JavaScript SDK
- isomorphic-fetch: library required by Dropbox JavaScript SDK
- crypto: to generate random strings
- node-cache: to store data in local cache
Run the following command to install the libraries above:
npm install dotenv express-session dropbox isomorphic-fetch crypto node-cache --saveIt is important not to hardcode any sensitive information. What you can do is create an .env file where you place sensitive data and make sure that file is never uploaded to a remote repository independently of the version control system you use. If you are using git, then you will add the .env to the .gitignore file. The dotenv library will read values from the .env file and add them to the current process. You can access these values via process.env.<variable_name>
To load the values in the .env file, add this code as the first line of your app.js file:
require('dotenv').config({silent: true});And create a .env file at the project root level with the following content:
DBX_APP_KEY=<your_app_key_from_developer_console>
DBX_APP_SECRET=<your_app_secret_from_developer_console>
SESSION_ID_SECRET=<create_your_own_secret>
Web sessions will provide a mechanism to store access tokens and avoid the need to authenticate each time, additionally are a key element to handle multiple users. Let’s configure the middleware that enables Web sessions. For this, we use the express-session library. Whenever a browser makes a request to the server, a session for that user is retrieved and a cookie on the client will hold a reference to that session.
In the app.js file, right after the app variable is assigned (var app = express();) add the following code:
//session configuration
const session = require('express-session');

let session_options = {
  secret: process.env.SESSION_ID_SECRET,
  resave: false,
  saveUninitialized: false,
  cookie: { secure: false } //only for dev purpose
}
app.use(session(session_options));
This is minimal initialization that sets a cookie when the browser first hits the server and allows to use non-secure http connections for development purposes only. Notice that session data is not saved in the cookie itself, just the encrypted session ID. Session data is stored server-side. The SESSION_ID_SECRET is used to sign the session ID cookie.
Note: If you plan to move to a production environment you need to take special attention to this configuration. You can learn more about this library in their GitHub repository. It also uses by default MemoryStore that according to their site “Is purposely not designed for a production environment. It will leak memory under most conditions, does not scale past a single process, and is meant for debugging and developing”. Additionally, whenever you stop the server, the MemoryStore is cleared out. You may consider using Redis as we explain in this other tutorial.
OAuth code flow
We will implement an OAuth authorization code grant flow with the below following sequence.
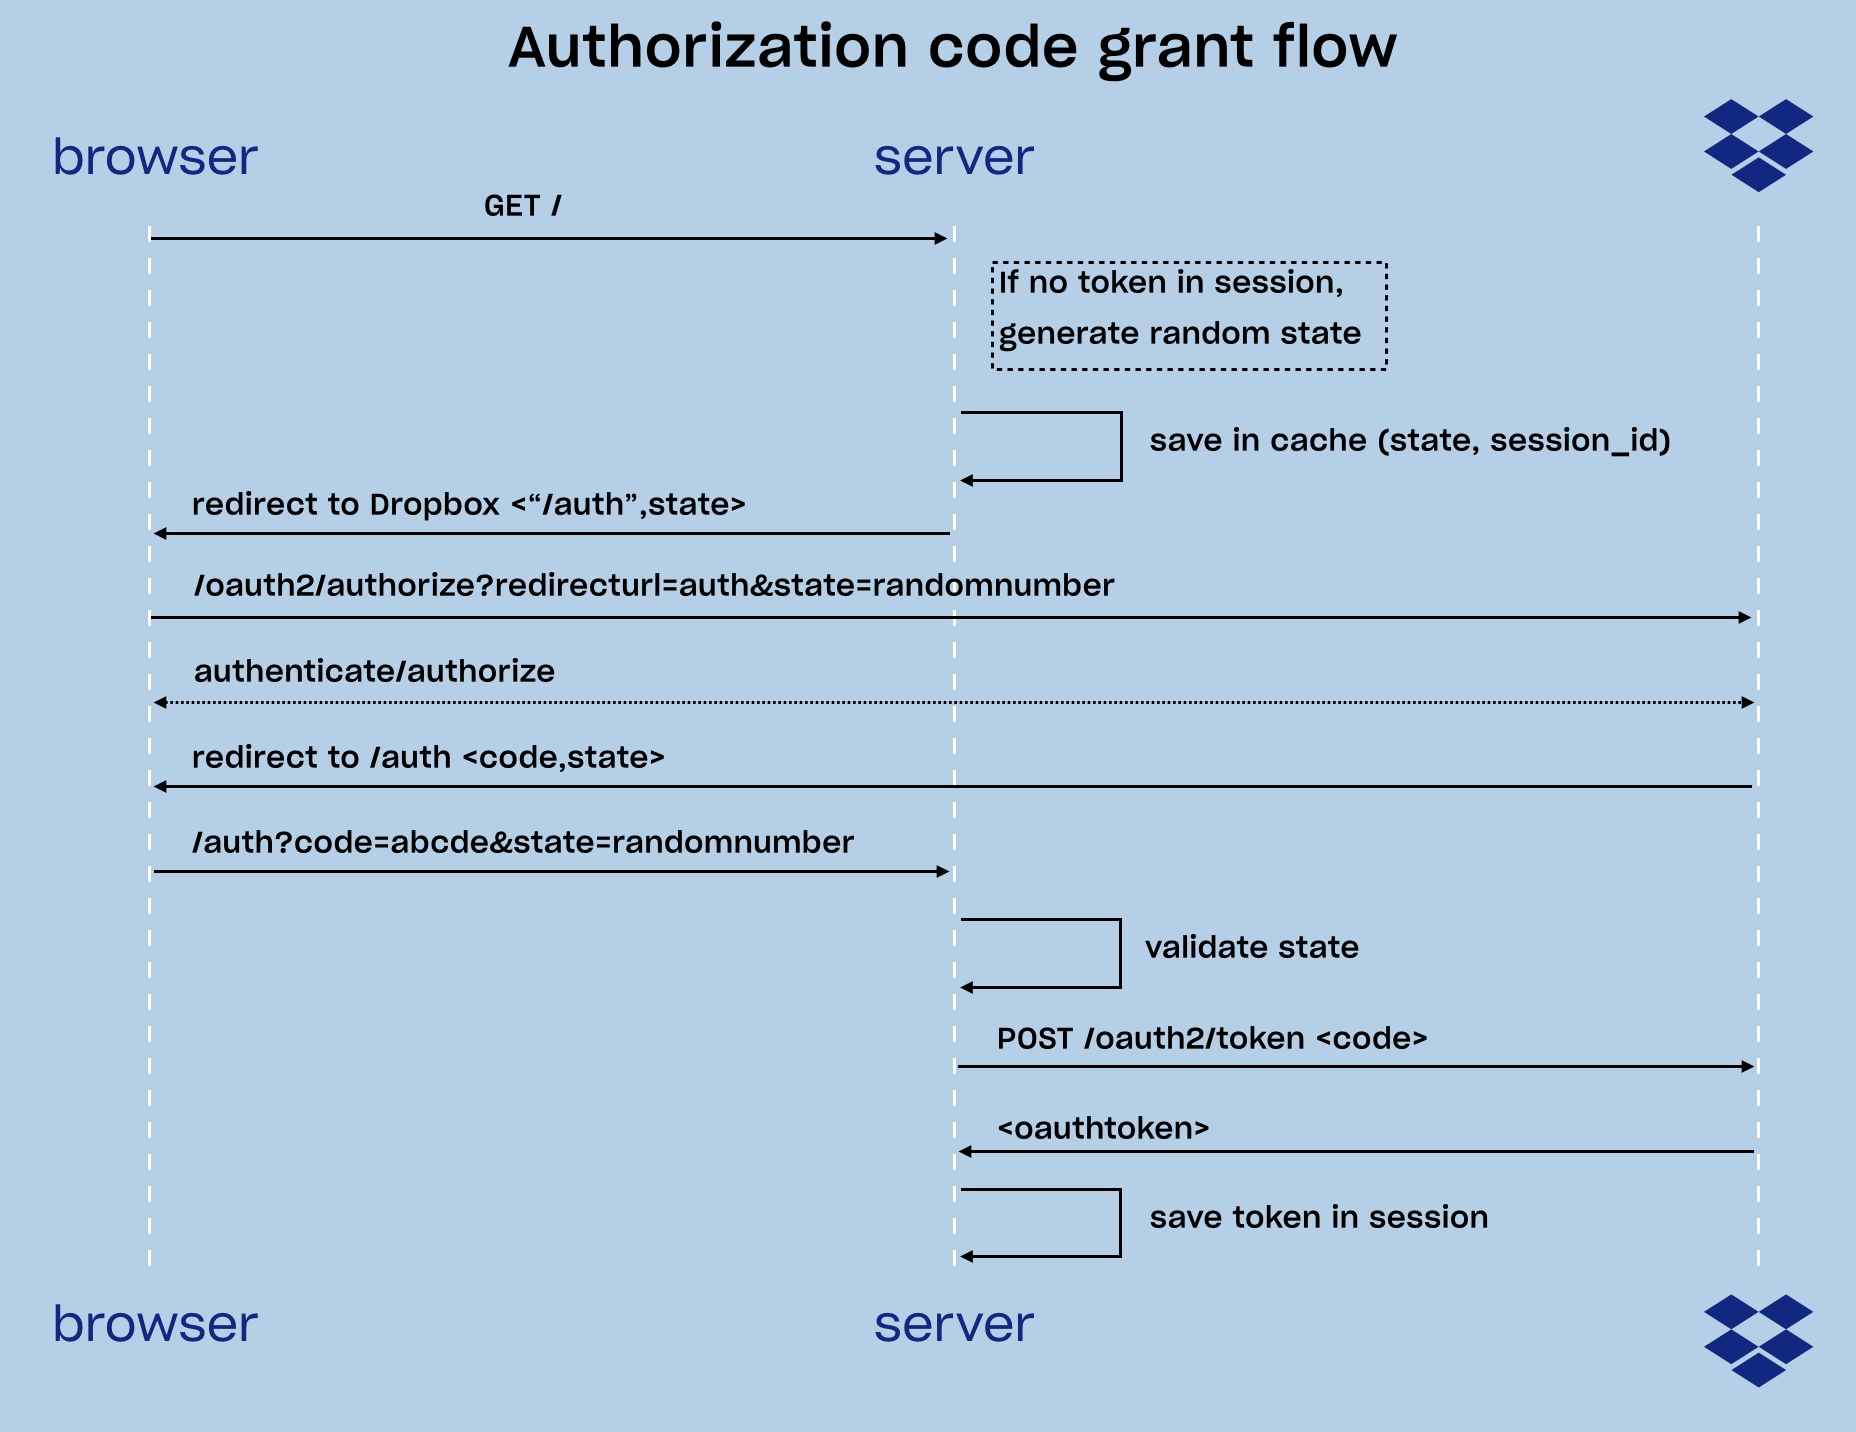
When a request is received in the home route /, we check if the session for that user has already a token stored in it, if that is the case, we can use the token directly to get resources from Dropbox, if not, then we need to get a token. To do that, we generate a random state using the crypto library and the node-cache library to save in cache for a few minutes with the state as key and the session id as value. Then we use the Dropbox JavaScript SDK to obtain the authorization URL and redirect the user to that address. This will handle multiple users as each user will have a different state and session id. If the user takes too long to validate credentials and authorize the app with Dropbox, the cache will expire, adding an extra layer of security.
After completing authentication and authorization with Dropbox, the user will be sent back to the redirect URL along with the state string we sent and a code. We validate the state checking that there was a session id for it and use the Dropbox JavaScript SDK to exchange the code for a token. Finally, the token received will be saved within the current session so next time the user reaches the home page /, they will be able to use Dropbox resources as long as their token is still valid, bypassing the need for authorization.
To implement this flow, we need to add two routes to /routes/index.js. You can simply replace the whole file with the following code:
// /routes/index.js
var express = require('express');
var router = express.Router();
const controller = require('../controller');

router.get('/', controller.home); //home route
router.get('/auth', controller.auth); //redirect route

module.exports = router;
Now add the controller. Create a controller.js at the project root level with the following code:
const crypto = require('crypto');
const NodeCache = require( "node-cache" );
const Dropbox = require('dropbox').Dropbox;
const fetch = require('isomorphic-fetch');

//Redirect URL to pass to Dropbox. Has to be whitelisted in Dropbox settings
const OAUTH_REDIRECT_URL='http://localhost:3000/auth';

// Dropbox configuration
const config = {
  fetch: fetch,
  clientId: process.env.DBX_APP_KEY,
  clientSecret: process.env.DBX_APP_SECRET
};

var dbx = new Dropbox(config);
var mycache = new NodeCache();

module.exports.home =  async (req, res, next)=>{
  if(!req.session.token){
    //create a random state value
    let state = crypto.randomBytes(16).toString('hex');
    // Save state and the session id for 10 mins
    mycache.set(state, req.session.id, 6000);
    // get authentication URL and redirect
    authUrl = dbx.getAuthenticationUrl(OAUTH_REDIRECT_URL, state, 'code');
    res.redirect(authUrl);
  } else {
    // if a token exists, it can be used to access Dropbox resources
    dbx.setAccessToken(req.session.token);
    try{
      let account_details = await dbx.usersGetCurrentAccount();
      let display_name = account_details.name.display_name;
      dbx.setAccessToken(null); //clean up token

      res.render('index', { name: display_name});
    } catch(error){
      dbx.setAccessToken(null);
      next(error);
    }
  }
}

// Redirect from Dropbox
module.exports.auth = async(req, res, next)=>{

  if(req.query.error_description){
    return next( new Error(req.query.error_description));
  }

  let state= req.query.state;
  if(!mycache.get(state)){
    return next(new Error("session expired or invalid state"));
  }

  if(req.query.code){
    try{
      let token =  await dbx.getAccessTokenFromCode(OAUTH_REDIRECT_URL, req.query.code);
      // store token and invalidate state
      req.session.token = token;
      mycache.del(state);
      res.redirect('/');
    }catch(error){
         return next(error);
    }
  }
}
Finally, modify the home page to display the information retrieved from Dropbox. When a user successfully authenticates and has a valid token, we get the display_name using the Dropbox JavaScript SDK and show it on the page. Replace the /views/index.hbs with this code:
<!-- /views/index.hbs -->
<h1>Logged in!</h1>
<p>Hello {{name}}</p>
You can now start the server locally on your machine
npm startAnd go to http://localhost:3000 in your browser. You will go through the authentication, authorization flow and finally to a page that shows your name retrieved from Dropbox.
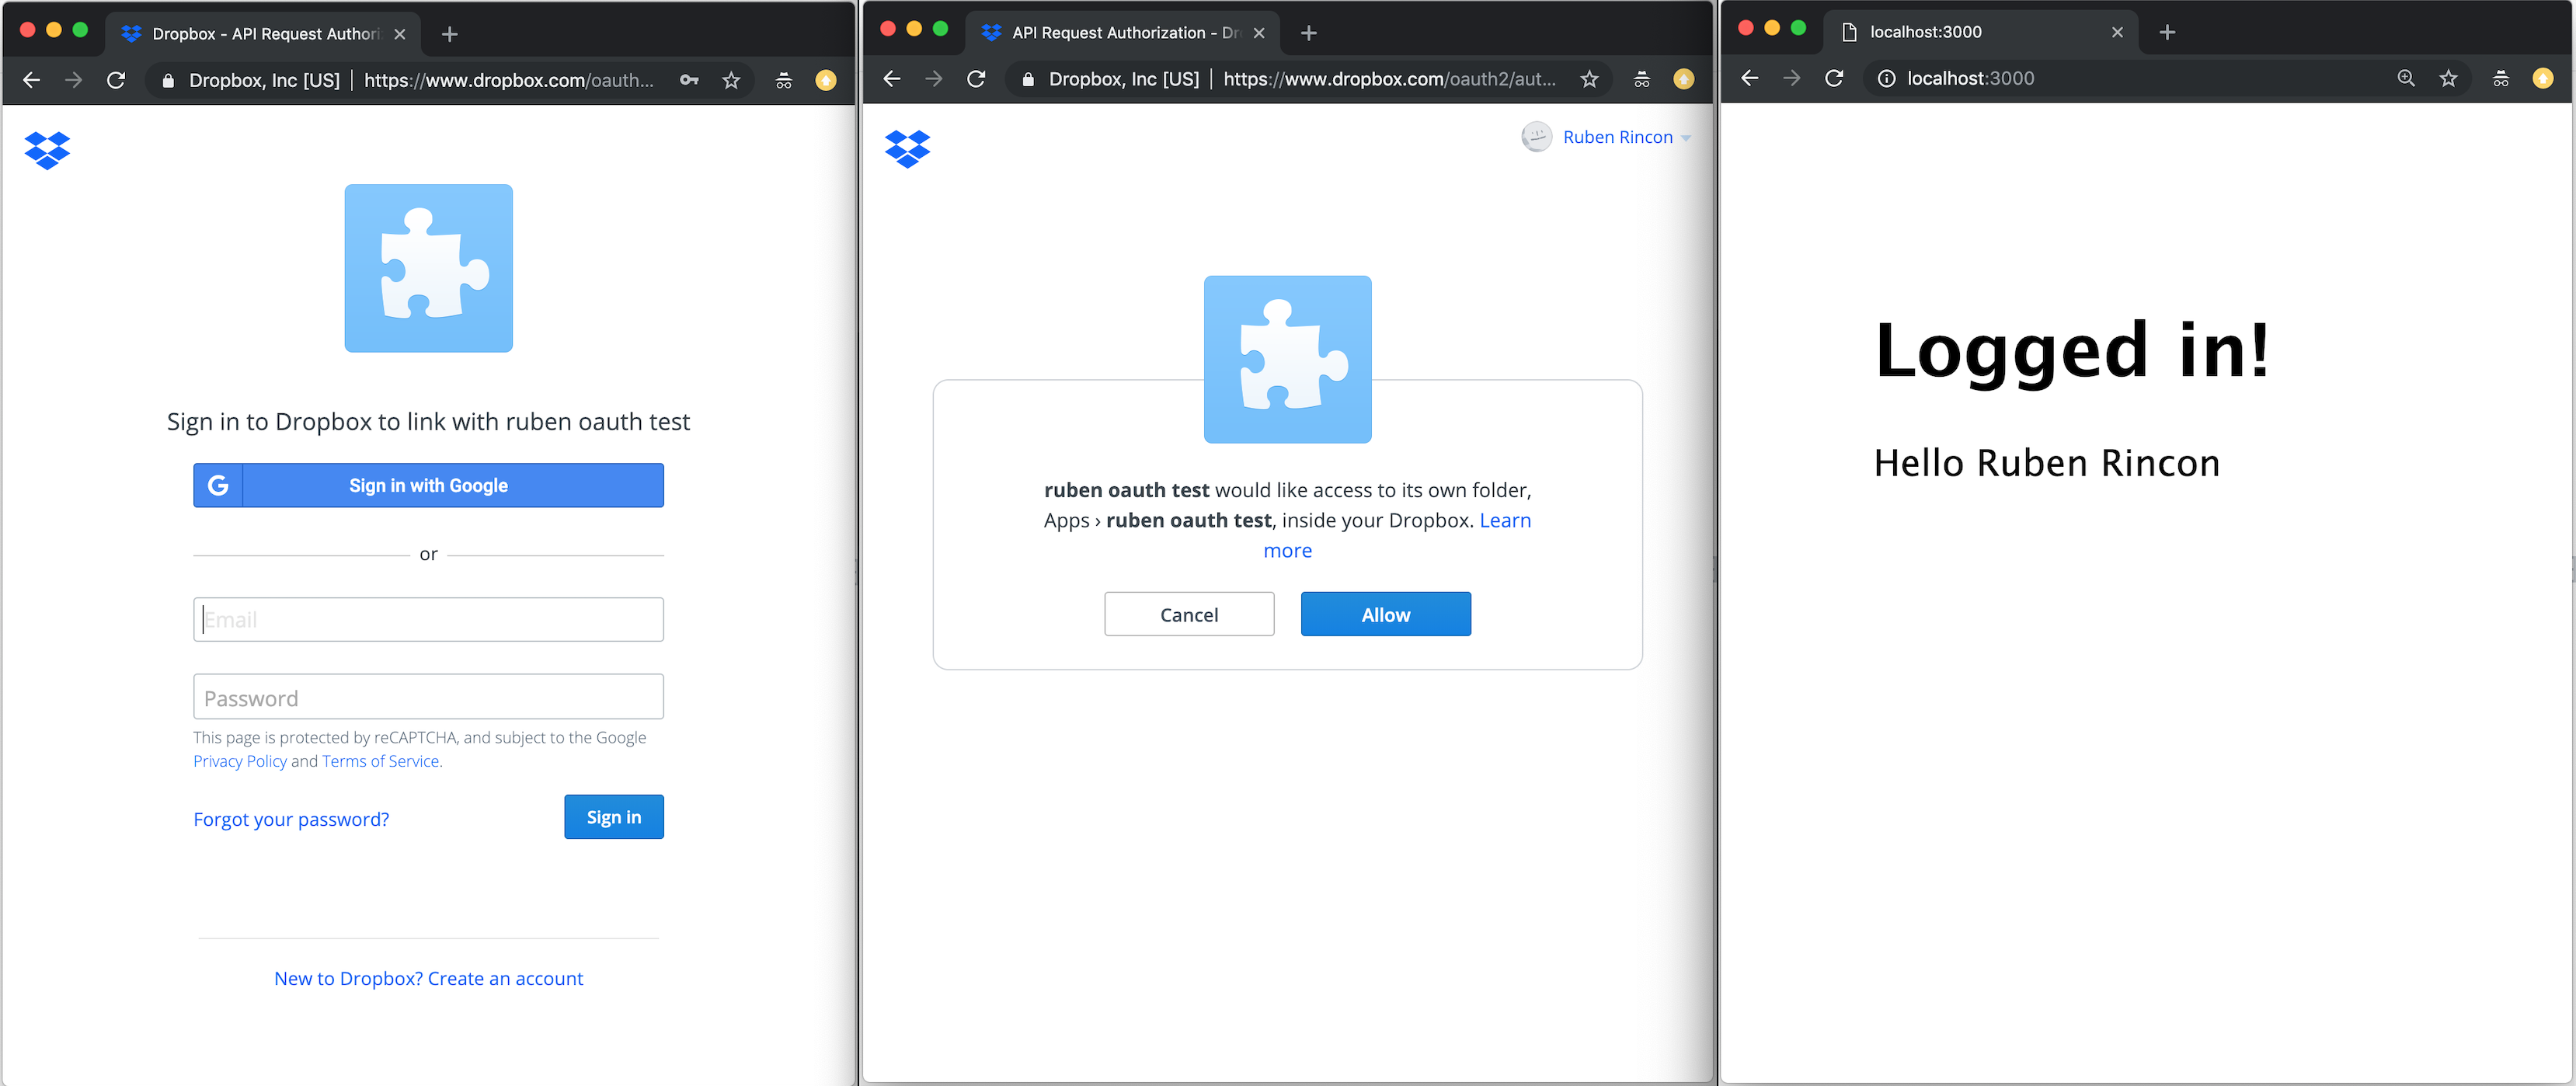
🎉 Congratulations! You have successfully implemented an OAuth authorization code grant flow.
Where to go from here
If you have any questions about this or need help with anything else, you can always contact us here.


